Showing posts with label Gardening Techniques. Show all posts

Monday, March 26, 2012

Camping Caterpillars

Yes, I am aware that the gardening year has come early in North America.  And it has discombobulated just about every plant species and human gardener beyond any historical measure.  Now, similarly scrambled, it seems the insects are joining the parade.  Early, Early, Early.

I noticed this weekend that I already had two of these delightful little fuzzy caterpillar nests in a young ornamental cherry tree.  I tend to lump all these creepy, crawling little blights under the term "webworms", but a little research tells me that in my area, in the Spring and in a cherry tree, these are likely Eastern Tent Caterpillars (Malacosoma americanum).  The real webworms, (Hyphantria cunea) occurs in the fall and are less discerning upon which trees they inflict.  Of course, my invasion could be gypsy moths or Forest Tent Caterpillars, but to discern the differences, I'd have to let these barely visible white caterpillars mature a little bit, and I'm not about to do that.  Odds being what they are, for the sake of simplicity, let us just call these Eastern Tent Caterpillars. 

As an interested amateur biologist, I was fascinated to read how their tents are oriented to face the southeast, taking advantage of the strongest rays of the early Spring sun to warm them up in the cooler air.  And as a veterinarian, I was previously unaware that they have been linked to "Mare Reproductive Loss Syndrome."  It seems that when pregnant mares are fed the caterpillars, they abort.  No one is sure of the exact pathogenesis, but the causal link is well established.  I'm astonished that the link was even made; I mean, who sits around watching their pregnant mares eat Eastern Tent Caterpillar nests?

Regarding control of these little beasties, I find myself doubtful about the common recommendation to simply tear a hole in the silk to let the birds get at the caterpillars.  What would stop the caterpillars from reforming their "tent", since they reportedly add to its size every day?  I'm therefore sad and embarrassed to admit that I resorted to dousing these babies with a Sevin drench.

In my defense before the court of the WEE (Wild-Eyed Environmentalists), this tree is an ornamental and doesn't produce edible cherries so both the birds and myself are safe.  But them caterpillars are toast!


Sunday, March 25, 2012

Working Day

No philosophical rambling yesterday, my friends, no time here to play.  Yesterday was a work day at ProfessorRoush's garden; mulching, weeding, transplanting, dividing, and general all around "leave the gardener aching" day.  Well, okay, there was a little play, since nearly everything I just listed is really playtime for me.  But, all in all, a pleasant and satisfying day of life.

I need to let you in on a big secret, however.  I've got a tool for you to add to your garden armory.  No, not one of those tools that you buy once and then leave hanging in your tool cabinet or shed unused.  This is not toolshed clutter.  This is shear genius of tool creation.

I'd like to introduce you to the Radius Garden Pro Weeder, found online at www.radiusgarden.com.  I first saw this gardening lifesaver at the annual Manhattan Garden Show, and thought it interesting but a little pricey at $50.00.  Then, fate intervened to send me exactly $50.00 of "mad money" recently and I took it as a sign from the gardening gods that I was destined to own it.

The second big secret is that, while I'm sure it is a nice weeder, weeding is not remotely its best function.  Think of this, those of you with clay soil interspersed with rocks, as a small spade, able to reach down deep between the stones and pry them up.  And more importantly, able to CUT THROUGH THE TOUGHEST MISCANTHUS CLUMP TO DIVIDE IT INTO NICE PLANTABLE PLUGS!  Forget about the team of sweaty muscular young men to lift the grassy clumps and the chainsaws to divide them. This baby let me transplant my Miscanthus, albeit minus a couple of growing years, where it needs to be rather than where I originally planted it.  I'm going to now burn out or Roundup the rest of the clumps.  No need to break my back anymore in a fruitless attempt to move mountains!

It's built extremely tough, with, as you can see on the back, a nice strong spine to prevent bending.  My pictures show a working weeder, dirty and smeared, but it is made of stainless steel and has a rubber molding around a steel core clear to the "O-ring" handle.  I don't know that it needed more than a "D" handle, but the O-ring is workable and comfortable to use.  It comes in several colors for those who care about the color of a gardening tool.  But, most important, there is no bending or breaking this baby. 

The real secret is in the tip.  It's about 2.5 inches wide and its not sharp enough to slice you inadvertently, but it is sharp enough to go easily through the tough clay and small enough to work between stones.  Think about the force on the tip;  a normal spade, with a width of 6-8 inches, distributes my weight along all of that width.  This baby multiplies my force by 3 times at a minimum.  Genius!   It's a pry bar with a handle!  It's a spade for the Flint Hills!  It's a bulb planter with wings!

Consider this just a tip of the gardening hat to a fabulous tool from a gardener who has no connection with the manufacturer nor who gets directly or indirectly paid for this endorsement.  This one will not live solely in your tool collection, but will become a real workhorse in your garden.  And worth every penny just for the savings in Miscanthus plugs.

Sunday, March 11, 2012

Techno-Teasing Trauma

I was out running errands around town yesterday and, entering a large home improvement box store that will remain unnamed, I was captured, as usual, to look over the entry display of various bagged up bulbs and perennials. As a general rule, I try to avoid spending any time in front of those racks because I know that most of these plants and bulbs will be dehydrated with little chance of survival and also because they are very common perennials and thus below the standards a real gardener should hold for themselves. Since I'm not a real gardener, however, I nearly always leave with a bag of something or other. Talk about your impulse purchases.

Anyway, today, it was a bag of Tigridia, the tiger flower, that caught my eye. Having never seen them before, and seeing that they were promoted as "Sun Lovers" (see the package below), my first thoughts were a) "That would be good for a novelty," and b) "I wonder if they are hardy here?" The packaging didn't list a USDA hardiness zone, but it did have one of those wonders of modern convenience, a QR Code, pictured here at the right. And I, being ProfessorRoush and of an early technologic bent, have just such a code-reading app on my Smart Phone.  Go ahead, try it out.  It works on the screen too. 

So there are the Tigridia, on sale at Home Depot, and here you are, the technically-proficient and thoroughly modern gardener.   The package QR Code links you for more information to the Longwood Gardens website. And what do you find? The message"LFGinfo.com spring bulbs coming soon." To quote the Peanut's character, Charlie Brown, "Aaarrrgggh!"
HELLO! STOP TEASING ME WITH YOUR PROMISES OF KNOWLEDGE!  It's already Spring, almost past it, in many parts of the country.  I'm a poor, uneducated common gardener just looking for help.  Do you think it is about time to post the necessary information up?  Why put the QR code on the packaging if it is not even active yet?

I've since found out that Tigridia pavonia is only hardy to Zone 8, and further more, is short-lived, each flower blooming only for a day.  Wonderful.  I just purchased an annual daylily. Of a truly ugly magenta coloration.  Just what I wanted.
Well, such runs the disappointments of our gardening lot.  Doomed forever to take a $6.98 chance on twenty dehydrated, decrepit bulbs that I now find will, in fact, likely not survive winter in my Zone 6 climate.  Tigridia  is noted on one website to grow in Olathe, Kansas and Lincoln, Nebraska, if, like dahlias, you are industrious enough (or crazy enough) to dig them up every fall and replant every Spring.

I don't grow Dahlias for just that reason.  As I've noted many times, digging and replanting bulbs in my stone ridden soil is a Sisyphean recipe for a broken back and a broken gardening spirit.  But I will try to enjoy the Tigridia for this summer, fleeting as they may be.  Those few flowers, at least, whose bulbs survive their dessicated state in my drought-stricken Kansas soil long enough to grow and bloom.


Wednesday, October 19, 2011

(White) Blackberry Dreams

Long time readers of this blog will remember my ramblings last fall on the history of Burbank's White Blackberry, and also recall my quest to find a surviving specimen of this once world-famous wonder.

Well, I'm pleased to show you that, thanks to a generous benefactor, Burbank's White Blackberry now grows in my garden.  Last fall, I received 6 cane runners in the mail and needless to say, I treated them like gold.  Hedging my bets, I planted the two strongest canes outside in the main garden, put two weaker ones in another more protected spot, and tried growing the remaining two in a sunny window through the winter.  Only the two that were strongest survived, but those two are one more that I needed to get the strain going here.  I can taste those delicious berries already, even though the floracanes won't be mature till next year. 

They already look different than my other blackberries.  Pictured in September at the top right, and early this spring at the lower left, they are healthy, but still look different.   They are shorter than my non-thorny cultivars, a lighter green and a bit less glossy on the leaf surface.  But most of all, the canes, in cross section, are star-shaped rather than round.  Odd, but who knows what the actual breeding of this darling entailed?  Luther Burbank was always bit lax on public disclosure of his methods.

The kind gentleman who provided the rooted cuttings must remain anonymous because I don't want him deluged.  Deluged, that is, by the hundreds of requests that I anticipate will come from all over next summer when I show you my fabulous white berries.  But I will, here and ever after, acknowledge my debt to his generosity and say Thank You, in public.  They survived my meager care, buddy, and now grow again in the Flint Hills.

Wednesday, August 10, 2011

Bird Gifts

While we are on the subject of volunteer plants (see yesterday's post), I'd like to show you another shrub that popped up on its own, this time in a border next to the house.  This is a 6 inch tall specimen of Cotoneaster apiculatus, or Cranberry Cotoneaster, that has seen fit to try to sneak in unnoticed to my landscape.  Compared to my cultivated, nursery-purchased specimens, which are attacked by spider mites and look wretched every year during August, this one is either in a spot more to its liking or it is too small yet to be noticed by the spider mites.  It is green and healthy and proclaiming its right to life, and I think I'm going to transplant it and give it a chance somewhere. 
I always have trouble pronouncing certain species and Cotoneaster is one of them.  Wikipedia tells us the phonetic spelling is  kəˈtoʊniːˈæstər, which is even worse for me than trying to interpret the Latin.  There are symbols there that aren't even English for gosh sakes. I turned, as usual to the excellent Fine Gardening Magazine's pronunciation guide which audibilizes the word for you and which I would say as "Ko-tone-e-aster."  There, now, isn't that simpler?

Because of the uncertain genetics in this volunteer, however, I suppose that I can't assume that it will stay in an expected 3 foot tall by 6 foot diameter space, so I'm trying to find a spot somewhere on the periphery of the garden where it can romp away if it feels a genetic need.  I presume that this one is from a seed spread by a bird, just as the mulberries in my yard must be, and so hopefully it will bear and increase the food available to my flying winter garden inhabitants.  Of course, this bird-sown gift may benefit the bees more, because my larger cotoneaster's are covered in white flowers every spring and the bees flock to them as an early source of nectar.  The birds helping the bees.  There's got to be a metaphor for love in there somewhere.


Monday, July 25, 2011

Mowing Bedlam Revisited

In a post written last March titled Mowing Bedlam, I described how I've completely ceased any extensive maintenance on my iris and daylily beds.  Instead of individually cutting down each iris in nice fans and individually removing the remnants of last year's daylily foliage, I have been simply mowing them off and I thought the results were quite acceptable.  

Well, year two of the experiment on the daylily beds has been complete, and the results, seen at right and pictured from the opposite end of the bed as in my previous post, are just, if I say it myself, gorgeous.  And I've done nothing at all to the bed this year (no fertilizing, watering, or extra mulching) except spend about 10 minutes weeding it.  Not 10 minutes a day or 10 minutes a week, 10 MINUTES THE ENTIRE SUMMER.  It seems that chopping up last years foliage and leaving it behind as mulch is quite sufficient to keep the decent bloom going.

You'll recall that I also threatened to start mowing off the peonies and let the foliage also lie where it was chewed up by the mower.  Well, you can compare the picture of the partial bed at the left, taken in May, with the picture below of the same area, taken exactly 2 months earlier.  I don't think the peonies look any worse for wear and this was not even a good peony year; a cool wet spring resulted in the loss of  quite a few peony buds to botrytis and it didn't seem to matter if the peonies were massed in this minimally-cared for bed or separated in other beds.   


In fact, the picture above is a decent example of one of the reasons to photograph your beds.  I thought the peony season was wasted this year, but looking back at the pictures, it looks pretty good to me.  The same thing happened with my roses; I believed I had a dismal early rose season because of the wet weather, but the pictures I took of the garden in mass look like it was blooming away with no thought for tomorrow.  Using the camera really does help us see as if we were looking through the eyes of another gardener, one separated from the frost and wind and heat.


 Anyway, all written sources to the contrary, I'm continuing this experiment.  No fertilizer, no extra water, and no extra mulch but the foliage of these perennials back on the ground again this fall.  If these beds stay looking this good, my low-maintenance dreams are realized.

Tuesday, July 19, 2011

The DripMaster

I'm proud to announce to gardening civilization that I have joined that adventurous set of gardeners who have created actual irrigation systems all on their own. Yes, I am a newly-minted and self-proclaimed DripMaster. I have taken that first step onto the ever-downward path of water conservation and without so much as an "Obi-Wan" to guide me.  Before you know it, I am sure I'll be buying Birkenstocks and tie-dieing my old gardening shirts.

This past Sunday, in the early morning hours before the heat rose high enough to fry bacon on my landscape rocks, I opened the RainDrip Landscape Kit that I had purchased on sale and on a whim a couple of weeks back.  Breathless in my fear of the unknown, I laid out the myriad of "T-connectors" and "pressure-reducing" valves and "1.0 GPH drippers" and  quarter- and half-inch tubing and began to sort through the foreign language of the manual.  Like all "how-to" manuals, this one started with a suggestion to carefully plan the layout of the drip irrigation system on paper beforehand.  At that suggestion of course, like every good do-it-yourselfer, I laughed and tossed away the manual.  Who's got time for planning?
  
To experiment with drip irrigation, I chose a bed new to my garden this year, one that Mrs. ProfessorRoush and her smaller sidekick had complained was a step "too far"  in my secret plans to take over the yard.  This one currently has a few 'Matrona' sedum divisions and about nine new Griffith Buck roses that are struggling in the Kansas sun.  I've been hand-watering this area all spring and summer, turning aside my usual policy of letting my garden plants live or die on their own in the certain knowledge that it has been way too dry this spring to give the tiny roses a fighting chance.  Knowing that I've got 8 or 10 other roses already ordered to add to this bed, I thought setting it up for irrigation might save this gardener from withering in the coming August alongside the new roses. 
  
 
About an hour or so after starting, I had the entire system finished and dripping away, just before the temperature hit the 100F degree mark and I started dripping away alongside it.  The starter kit was quite sufficient to create the system for this small bed and yes, I planned for expansion to the new roses once they are planted.  In fact, the 50 foot main tubing in this kit was enough to start a system in another bed, but I ran out of drip heads before I could finish that one.  The bricks in the picture above are temporary until I can purchase stakes to hold the curves in place.  I think I'll be smart and not bury the thing under mulch until the new roses come in and are planted. And, since I know that you are wondering, No, I did not run drip irrigation to the 'Matrona' sedums in the bed.  I know that they'll do fine on their own without the extra watering and I am, after all, the DripMaster. 

Thursday, July 14, 2011

A Plea for Peas

I don't know how many other gardeners have tried the old-fashioned fragrant sweet peas in their gardens, but if you haven't, consider this a plea for trying these lost lovelies.  To experience the fragrance of one of the hundred-year-old varieties like 'Painted Lady', is to experience Shangri-La, Nirvana (not the band), Vahalla, Eden, and Heaven, all wrapped into one.

'Royal Family Crimson' Sweet Pea
This year I'm growing 'Royal Family Crimson', a lipstick-red variety with a bit less fragrance than some of the older types, but with more "wow" power in the garden.  I chose them from the Select Seeds website after reading that they were bred for heat-resistance and were perfect for cutting, so they seemed to be worth a shot in my hot Kansas garden.  Indeed, they are living up to that reputation because the picture at the right was taken this morning, after a number of days of plus-100 heat in the past two weeks.  My previously grown sweet peas would have given up on blooming and started drying on the vine by now.  I have grown a number of different varieties over the years, from the old-fashioned 'Cupani's Original' to pure white 'Royal Wedding', to pink and red-striped 'American Crimson'.  'Painted Lady' is one of the oldest cultivars, very fragrant, and is widely available and she is one of my favorites.

Mixed varieties of Sweet Peas.
For the uninitiated, fragrant sweet peas, or Lathyrus odoratus, are a different species than  perennial garden sweet peas (Lathyrus latifolius; similar in form but not fragrant), and are a different genus altogether then the sweet peas we grow to eat (Pisum sativum) .  In fact, Lathyrus odoratus are considered poisonous.  For that reason, even though I know intellectually that they won't cross-pollinate, I don't grow them near consumable sweet peas from which I save seed.  I simply don't want to chance finding out I'm wrong when Mrs. ProfessorRoush whips up a nice batch of creamed peas for me.

The ancestors to the modern fragrant sweet pea varieties arrived in England in 1699, sent with or sent by a Sicilian monk named Cupani.  Directed breeding started in the 1880's by a Scotsman named Eckford. They became very successful commercially, especially with the discovery of the large-flowered Spencer types, so named because they occurred as a natural mutation in the gardens of the Earl of Spencer. They were all the rage in the early 20th century when whole flower shows were commonly devoted exclusively to sweet peas, but in the past few decades the number of gardeners who grow them seems to have faded away.   As soon as I discovered them, however, they became one of Mrs. ProfessorRoush's favorite flowers (and mine as well).

Here in Kansas, sweet peas are simple to grow and are planted in the early spring, just a little earlier then eating peas are planted.  I'm told that gardeners in milder climates should plant them in October for spring bloom, but I can testify that the seed and seedlings won't survive a Kansas winter.  I've found that mine germinate better if they are soaked for a full day before planting.  They love a spot in the sun that drains well but is constantly moist, and appreciate a little compost and extra fertilizer.  Most varieties grow as vines about 6 feet tall (although dwarf bush types are available), and so they must be provided with a trellis or fence to climb.  Mine do well with a steel cattle panel placed next to the seed line as they emerge, and I grow them in the vegetable garden currently, although in times past I have planted them beneath the shrub roses and let them climb among the branches.  If you want to keep the fragrant flowers blooming longer, dead-heading has to be done as each bloom fades.  The heirloom varieties all come true to seed if planted separately, and I keep the best varieties from year to year whenever I remember to save the seed.

I'm fairly sensitive to the strong fragrances of some plants.  I don't like, for instance, to eat in a room with even a single cloying blossom of an Oriental Lily.  But fragrant sweet peas, just as strong but not as intrusive, slip slowly into your awareness like a warm wife coming to bed late on a cold winter night.  And they are every bit as enjoyable as the latter.  Well almost, anyway.  Try a few sweet peas, wherever you can obtain them, and I promise that your sweetie will make you grow them evermore.


Wednesday, July 6, 2011

Broken Dreams

This isn't the blog I had intended for today, but blogging gardeners often grasp clear moments of illustration when they occur.  I've written previously about the ephemeral, fickle nature of good weather in Kansas, and this morning I have proof for the skeptical.  So, through the blur of my tears, I present to you the tallest (5 foot tall) of the 'Yellow Dream' Oriental Lilies that I blogged about yesterday, now staked and tied to an old broom handle.

You see, last night at approximately 8:30 p.m., a north wind suddenly rose frantically outside the house; dead calm one minute, and then 50 or 60 mph gusts the next, stirring the dust off the top gravel road and rattling the windows.  I took a step out our west door to look around and about got clobbered by a flying shingle off the roof.  We were on the west edge of a storm that was heading south; just close enough to catch the wind, but very little of the rain.  This morning I woke up to inspect the damage and found the sole victim was this lily, the one inch thick stalk bent over at a 90 degree angle 3 inches above the ground.  On the picture below, the entire plant is circled in white and the bent portion of the stem circled in red (the dry leaves at the right of the picture are a blueberry that got crisped in last week's three digit heat). This kind of catastrophe certainly wasn't worth trading for 0.2 inches of rain, even in this dry summer season.

I don't know if it this 'Yellow Dream' will live to open another flower or not. Or if not, if the bulb will survive with all its energy already expended into all these beautiful flowers.  I know only that it serves as a perfect example of what often happens to the largest, fastest growing plants of my landscape.  The sisters of this flower nearby were shorter and better protected by the surrounding plants so perhaps the lesson here is that in moderate growth lies survival.  Or perhaps the lesson is that this lily should have picked a better gardener, one who anticipated the storm and staked it ahead of time.  I should have known better.  I don't think that I lost any new basal rose canes from this storm, but I've learned, as stated before, to keep them pinched back to thicken them as they grow.

So, for this year at least, seeing this 'Yellow Dream' in full glorious display will remain just a dream.

Monday, July 4, 2011

Thistleocide

You know, and I know, that I've been working hard to preserve the native forbs by allowing vast areas of my prairie lawn to go unmown this summer.  Actually, my actions might be better described as "hardly working", since it takes more effort to mow than to let the prairie grow.  And I've been showing off my native wildflowers in various posts, like here, and here.

Regarding those native wildflowers, however, I draw the line at allowing the thistles to grow unchecked in the yard.  The spiky little gray-green creature at the  right is Wavy-Leaf Thistle (Cirsium undulatum), a less-than-lovable member of the Asteraceae (or Sunflower) family.   It is found throughout Kansas in dry prairies, disturbed areas, and over-grazed pastures.  Hmmm, "over-grazed pastures" is also a good description for a prairie mowed every two weeks or so for several years, isn't it?  Wavy-Leaf Thistle is not the only thistle I've found in the area; Bull Thistle or Cirsium vulgare is also found here, but the latter is not native and is listed as a noxious weed.  Wavy-Leaf Thistle is, however, the most prevalent thistle in my yard, and even if Native Americans did view it as a food source, I do not.

So, I'm dispatching them with a machete wherever they crop up.  Yes, I am a serial thistle killer.  There's just something so satisfying about swinging that big knife blade at my feet and managing to lop off a thistle at the base while avoiding my shins and toes.  It's almost a primeval satisfaction, born out of man's necessity to make his immediate environment more comfortable.  And I also know a secret about cutting thistles, a secret born of experience and farm lore, that I'll pass on to you.

Thistle-cutting, in my case, simply brings back memories of childhood.  I spent a fair portion of my youth on the seat of an old Massey-Ferguson 135 tractor with a "bush-hog" attached to the power takeoff.  Because controlling them caused me sunburn and sweat, thistles and ironweed were my childhood enemies, and I took great pleasure in chopping them down to size several times a summer.  I remember distinctly a five acre section of our cow pasture that had become overgrown with Bull Thistle to the point where neither people nor cows could walk it unscathed.  My paternal grandfather, a farmer from the time of horse-draw plows, related to my father that they should be cut down every year on June 21st, so for several years on the 21st of June, I'd be found mowing that pasture, rain or shine, usually in the boiling sun.  And lo and behold, the thistles declined over about five years until nary a one could be found.

Even back then, young but with an interest in science and nature, I recognized that the real secret was that on or around June 21st every year, the thistles were open in flower but none had yet gone to seed.  And there was not enough time left in the hot summer for a 3-4 foot tall thistle to grow back up and flower and seed again.  So the real trick was simply keeping these behemoths from procreating until they dwindled, an agricultural and military technique that has worked on many different native species time and again over the centuries.


So, I apologize to all the native plant purists, but my ingrained training will not allow me to let the thistles be thistles.  I'm also, of course, preempting Mrs. ProfessorRoush, who might have reluctantly consented to allow a little Echinacea and Black-Eyed Susans to proliferate, but who might become more adamant about removing the thistles.  To those of you who want to join the anti-thistle brigade, take my grandfather's advice and cut them to the ground in late June or early July (or exactly on June 21st to honor his memory with me).  Your pastures may not be purely native, but your bare legs will thank you for it, nonetheless.

Thursday, June 9, 2011

Leafsnap!

We interrupt this special series of local Kansas wildfauna to bring you a special announcement.

The local Manhattan Mercury ran/copied an Associated Press article tonight about a new Ipad/Iphone app called "Leafsnap." Using this app on your Iphone or Ipad, you can snap a picture of the leaf from any tree, preferably against a white background, and it searches a growing library of leaf images created by the Smithsonian Institution and returns a likely species name and information on the tree's flowers, fruit, seeds, and bark.

River Birch
I had only a few minutes before darkness tonight, but downloaded the app and it correctly identified a redbud and a river birch.

Did I mention it also collects the GPS where you snapped the picture and creates a "collection" for each user? That the eventual idea is that the app will be used by people everywhere to map trees in their area? That in the future the plan is for anyone to be able to locate a unique tree species in their local area?  At present, the app is just set up for New York, Washington D.C., and the northeast, but it allowed me to create an identity and correctly labeled my location in Kansas.  I am now ProfessorRoush on Leafsnap.

Imagine the same tool for insects, wildflowers, roses, fish....

Imagine the possibilities.....

Find the app on your local Apple appstore, or see it at http://www.leafsnap.com./  It's free.  And I guarantee it will bring back the Cub Scout, Brownie, 4-Her, or freshman biology student in anyone!


(PS:  I wrote this entire blog on my Ipad for the first time.  Except for the picture, which I could not get to upload to blogger from the Ipad either directly or through Photobucket.  I'll work on it.)

Wednesday, May 25, 2011

A Little Whitewash

We've now had 6 inches of rain in the past 6 days, the weather has turned cold again, and my  roses, at peak bloom, are drowned and misshapen.  You can stop now, God, and I promise I'll stop complaining about the lack of rain around here for awhile.

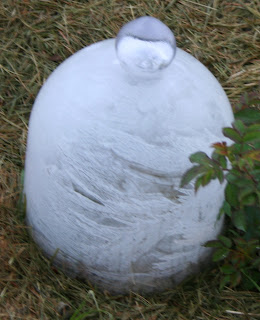
But I will take advantage of the lousy weather and lack of decent rose pictures to slip a little gardening tip into the blog.  I've written previously about obtaining some nice glass cloches last January that I was, and am now, immensely proud of.  They served me well through a frigid winter and a cold and unpredictable Spring here in Kansas until a few weeks ago, when the weather hit the 80's.  I found then that some of the new roses were getting a little bit "burnt" in them.  And no wonder, because I found later that a clear glass cloche in my garden, at an ambient air temperature of 81F on noon of a clear sunny day, has an interior temperature, measured by my soil thermometer, of 140F!  Time for the cloches to come off, but the weather has been so variable, and with night temperatures reaching into the 40's, that I really didn't want to keep them off, nor did I want to be running around every day and night covering and uncovering them.

So, when the rose leaves began to fry a little, I got it into my head that I could whitewash the cloches, just like K-State does its glass greenhouses.  I did a quick search around town for some plain old whitewash, thinking that a little "shading" would improve the problem, and came up empty.  So I turned to the Internet, the modern Tree of Knowledge of Good and Evil, and came up with a simply made whitewash formula.  After coating the interior of the cloches with my homemade whitewash, as shown above, the interior temperature on the same sunny day was only 98F, a vast improvement and survivable by the roses, particularly during weeks like this, where the high temperatures have been in the 70's recently, the nights in the 50's, and it has rained for days.

Remember fellow gardeners, cloches are just mobile greenhouses and whitewash does wonders for the plants under the glass.  The formula, cut down to a small, manageable amount, is below:

3 parts hydrated lime
1 part salt
8 parts water

If you substitute the word "cups" for "parts" above, it will make about a half-gallon of whitewash, which goes a long way, so you can cut it down if you need less (that's why I converted the recipe to "parts").    Be careful to mix in small amounts of each ingredient slowly, so that the powdery lime doesn't just clump up and become hard to stir. It was recommended to let it sit overnight, but I used it immediately and it seemed to work well. It's fairly watery when mixed, but remember it is a wash, not a paint.  I did use a paintbrush to slop it on the interior of the glass, though.  So nice to "paint" and not worry about how much I drip on the ground!

Monday, April 25, 2011

Time Flies, Peonies Rise

Good gravy, I've been puttering along through Spring, thinking that I have been keeping up pretty well with the garden chores.  I've pruned shrubs and burnt prairie grass, planted onions and potatoes, divided perennials, and even sprayed the apple trees for cedar rust, but I almost missed an important chore.  Gardener's, please don't forget that your peonies need your support!

I've got approximately 40 different peonies (when did that happen?), which constitutes a full crapload of peonies (as opposed to a half crapload).  I don't provide supports for all my peonies, just the taller ones standing alone as specimens in their borders, or the larger ones prone to topple.  Paeonia tenuifolia, low-growing and already in bloom, doesn't need support.  And many of my peonies are confined in a defined area (the "peony bed," what else?) where they can mostly lean on each other.   But, in total, I counted 21 commercial support hoops hanging in my garage this weekend when they should have already been in place hovering over the peonies.  Over the peonies?  Around the peonies would be a better description. Those babies have really shot up over the past two weeks, with many beginning full bud and topping better than 2 feet!


So I rushed around yesterday and got the supports in place.  Thank God that I've purchased a number of those commercial hoops that have a hook-catch so you can place them around already established clumps, such as the one shown above.  Other peonies, not quite so tall, are lagging and so they got the "unsnapable" supports that they can grow up through like the one at the right.  And a few peonies are just going to have to do without this year because I used some of the smaller supports for a few "front-and-center" sedums that have a tendency to flop around and look flat in late summer when they should be standing tall and proudly the center of attention. 

It's like a country song.  "Mamas, don't let your peonies grow up to be flop-mops.  Don't feed'em to much or shade them too much, Let'em be beauties and cut flowers and such." (Apologies to Waylon).  

Sunday, April 24, 2011

Easter Surprise


As Easter, 2011 finally arrives here in this slow-starting Spring, I've been given a present in the garden to watch over.   A white sport appeared on my 'Sensation' Lilac this year amidst all the deep purple, white-edged blossoms. This year, the Equinox Gods must be rewarding my earlier offerings to the start of Spring.

I appreciate the gift, but I would feel more special about it if a quick search didn't reveal that white sports from 'Sensation' are not especially rare.  There are several pictures of these sports on the Internet, and indeed, a webpage about plant sports by Professor Janna Beckerman from Purdue University's Plant Diagnostic Lab included a white 'Sensation' sport as a common example.


'Sensation' Lilac
'Sensation', for those gardeners who aren't familiar with it, is a popular lilac in commerce and in gardens because of the unique purple and white look to the blossoms that is commonly described as a "picotee."  Picotee is derived from the word "picot," which is a series of small embroidered loops forming an ornamental edging on some ribbon and lace, and the word "picotee" actually is defined as a carnation with pale petals bordered by a darker color.  'Sensation' then, I suppose, should be more accurately described as a reverse picotee.   'Sensation' also has nice heart-shaped foliage, but it is a rather stiff bush, growing 8-10 feet tall and wide, with strong, hearty branches that tend to be a little more sparse than most lilacs. To my amusement, 'Sensation' is labeled at many online nurseries as a "new" introduction, but it is actually an old lilac, introduced in 1938 by Eveleens Maarse.  According to Jennifer Bennett in her 2002 book Lilacs for the Garden, it was a genetic mutant of lavender-colored 'Hugo de Vries' that occurred when the Maarse greenhouse in Holland was forcing lilacs for Christmas. John Fiala, in Lilacs: A Gardener's Encyclopedia, lists it in a section with lilacs of "special and unique color classifications," and describes it as "outstandingly effective and unique."  Alongside the white sports, 'Sensation' has also been known to revert to the plain purple form resembling 'Hugo de Vries'.

For the scientifically-minded, the proper term for the mutation that led to 'Sensation' is a "periclinal chimera," which is a plant composed of cells of two distinct genotypes separated into distinctive zones.  Periclinal chimeras, as opposed to the other categories of chimera (mericlinal, and sectorial chimeras), are important because the mutations are stable and can be vegetatively propagated.  Thornless blackberries are perhaps the best known result from the formation of a periclinal chimera.  In the case of my white 'Sensation' sport then, the white flower genotype tissues have separated to give me a present.

Knowing all that, however, makes my own 'Sensation' sport no less of a miracle to me.  I'm going to watch it, and if it doesn't go through an ugly brown phase as so many white lilacs do when they fade, I'm going to try to propagate it.  Maybe someday I can have a part in releasing a lilac that will be named 'Easter Sensation.'

Sunday, April 3, 2011

Poisonous Compost?

It is not often that I get to combine the job that earns my living (veterinary medicine) with my interest that consumes the excess cash (gardening), but I happened on a connection recently in a post on Gardenweb.com.  That post was from someone who had been told and who believed that their dog had been poisoned by eating compost.

I was a little chagrined to hear about this toxicity in a random post on the Internet, but I'll be the first to admit that my general veterinary education lies far in the past and, as a surgeon, I haven't followed advancements in veterinary toxicology for the past 25 years.  I felt a little better when I found my internist colleagues were also unaware of it.  A little quick research tells me that, indeed, there have been some reports of dogs eating compost and suffering toxic effects, even though some of those reports are undoubtedly of  "garbage gut," or diet-induced gastroenteritis, cases rather than actual toxic effects. Compost toxicity is, however, listed as such on the petpoisonhelpline.com website.

Knowledge is power, so I'll repeat here what I've found. Toxic effects from compost are variably suggested to be due to mycotoxins (toxins produced by fungal organisms), or to clostridial toxins (bacteria that may grow when meat or dairy products have been added to the compost).  Meat, eggs, and dairy products, of course, have no place in your compost pile anyway.  To me, that means that most of the compost I produce from leaves and grass, particularly if aerated properly, should be safe if one of the bonehead Labradors owned by my neighbor accidentally gets into it.

Symptoms of poisoning could include agitation, increased temperature, panting, drooling, and vomiting, and severe cases could progress to incoordination, tremors, and seizures. Since many dogs I encounter pant and drool incessantly, those aren't very helpful unless other symptoms are present. There is no specific antidote.  Inducing vomiting or gastric lavage in cases of known ingestion should help decrease toxicity.  Supportive care such as procedures to decrease body temperature, IV fluids, and anti-seizure medications may be necessary in severe cases.

For prevention, toxicologists suggest that in concert with eliminating the use of meat and dairy products in your compost, the pile should be fenced off from pets and wildlife.  My personal compost pile does sit within the electric fence that protects my vegetable garden, but I'm under no illusions that it will keep out my Brittany Spaniel, who has been known to chase rabbits through the fence more than once, let alone the neighbor's dogs who don't seem to have enough total neurons to spare any for pain perception.  And what do I (or we collectively) do about the compost that we heap annually around every old rose in our gardens?

I remain a little bit skeptical, knowing by education that the gastrointestinal system of dogs is designed for them to consume a vast array of foods that would cause a billy goat to puke, and knowing by experience that they seem to suffer little ill effects from eating delicacies that range from ancient dead rabbits to raw soil and on to cow poop. Compost toxicity in dogs probably has occurred rarely, but it also ranks with those normal unavoidable risks that occur in life, like drinking from a garden hose or touching undisinfected shopping carts, both of which seem to be freaking out the general population these days. I wouldn't rush my dog, however, to a veterinarian for a quick stomach pump just because I saw it digging in the compost pile for a vole. 

In a similar vein, it did concern me a little during my research to find that a gardener in England had died from aspergillosis (a respiratory fungal infection) started by exposure in his compost pile, but I'm also not about to start wearing a face mask (as suggested in the article) when I turn my compost.  What would the neighbors think?  Somewhere the fear has to be contained by reason.

Monday, March 28, 2011

Life Inside the Windows

Ignoring for a moment that we've got about 1/2 inch of snow on the ground outside this morning after the weatherman predicted last night that nothing would stick....I still have hope that Spring is coming soon.


Anybody care to guess what the prairie-based (hint) Garden Muser is growing ahead for planting?  I'm not a great plantsperson for growing seeds under lights, but I think these have a slight chance of making it till last frost.  Each row is a different seed.  I'll provide a left-to-right listing of the cultivars in a few days.

There are also a few other surprises for my landscape sprinkled behind the windows. These are some Hyacinth Bean Vines (Dolichos lablab) that I planted in peat pots and enclosed in a plastic bag a couple of weeks ago.  They're just getting window sun, no artificial light, but they seem to be ready to sprout for the sky.  One of my fellow EMG's provided the seed last fall and I'm putting them on one side of a naked pergola to climb on this summer.  The other side, as mentioned in a previous post, will be a Passion Flower vine.  I plan to let them fight out who controls the center of the pergola.

Wednesday, March 16, 2011

Linseed Learnings

In a recent post I recommended the use of boiled linseed oil for the annual care of wooden tool handles and in doing so, and making sure I was conveying correct information, I got quite an education on linseed oil.  Here are ten facts about linseed oil that every gardener should know:

1. Linseed oil is actually flax seed oil.  I always wondered what a "lin" plant looked like.  Flax, I know. As an old man who hates burping  the fish oil recommended by the doctor, and who has been taking flax oil (also high in the Omega-3 fatty acids) instead, I think it's important to know that I'm preserving my arteries with the same crap that dries sticky and yellow on my wooden handles. Now the question is, should I, as a frugal gardener, save money and just drink from the $5.00 linseed oil can instead of buying the bottles of gel-caps?  Maybe the "do not take internally" text on the Linseed Oil can is a message in itself.

2.  The particular characteristic of linseed oil that makes it useful for our purposes is that it is a "drying oil" (along with tung, soybean, safflower, and poppy)  that polymerizes in combination with oxygen into a solid form.  It also shrinks very little on hardening and penetrates wood well. It is a traditional finish for gun stocks, cricket bats, billiard cues, and surfboards.

3.  In Europe cold-pressed linseed oil is eaten with potatoes and Quark cheese (a bland type of cheese).  The "hearty taste" of linseed oil supposedly offsets the bland taste of the cheese.  That means that a really terribly bland meal is made to taste like cardboard and is now considered edible.

4.  Linseed oil is water-repelling, but not water resistant.  Water penetrates a linseed oil finish in minutes and water vapour bypasses it completely.  Garden furniture treated with linseed oil may develop mildew.

5.  Linseed oil is a common carrier in paints, puttys and varnishes due to its drying properties.  Okay, no surprise, everybody knows this one already.

6.  Linseed oil was once used commonly to bind wood dust and cork particles into linoleum, a floor covering invented in 1860.  The use of real linoleum has declined as more durable PVC floor coverings have been developed.

7.  Linseed oil used to be boiled to cause it to begin polymerization and oxidation, thus making it thicker and shortening drying time.  Today most "boiled linseed oil" products are a combination of raw linseed oil, petroleum-based solvents, and metallic/catalyst dryers.  Modern boiled linseed oil is not edible, so stop chewing on the handles of your garden tools. 

8.  There was a National Linseed Oil Trust, formed in 1885 and based in St. Louis, that protected "linseed" interests in the United States.  It was dissolved in 1920 under charges that it violated the Sherman Antitrust Act.  As I read the history, essentially this was a linseed oil "cartel" that was accused of colluding to raise linseed oil prices.

9.  The polymerization of Linseed oil is an exothermic reaction, which creates a cascade of  heat buildup and make linseed oil-soaked rags particularly likely to cause spontaneous fires.  Always. always spread these rags out to dry before disposal and never just throw them into a trash can wet. 

10.  The primary world producers of flax seed  are Canada and China.  The United States was fourth in production in 2007 and almost all of the crop is from North and South Dakota, Minnesota, and Montana.

So, that's the short story of linseed oil.  Now that I know more about it, and have learned that it is one of the worst protectants of the natural oils against water, I probably need to choose something else to protect the handles of my garden tools.  Tung oil, for example, is more resistant to water, doesn't yellow with age, and would be a much better choice as a protectant.  But that brings up a whole bunch of other questions about using local versus imported substances (not many Tung nut trees are raised in the US) and the environmental effects of growing flax in mass quantities and on, and on.  Being a world-conscious consumer is so exhausting.

Thursday, March 10, 2011

ToolTime

Before the end of  weary Winter comes, before the annual rite of gardening known as Spring cleanup begins, all Midwestern gardeners should take advantage of this idle time of their discontent to perform needed maintenance on their gardening tools.

This Spring, one of my long-procrastinated chores was finally accomplished.  Before I trimmed my first rose cane, before I lopped off my first apple branch, I removed the ten-year-old, nicked, moderately rusted blade of my Felco #2 pruners and replaced it with a clean, sharp, brand-new blade.  What, you don't have a Felco pruner?  You fell for the cheap K-Mart Martha Stewart anvil pruners or the quick-to-dull Walmart Fiskars? And you call yourself a gardener?  Shame on you.  Yes, I know the Felco pruners are more expensive initially, but being able to purchase and change the blades is one of the reasons you buy Felcos. Now I've got an essentially new pruner without having to purchase one and my Felcos will be good for another 10 years.  The blades, by the way, are readily available on Amazon.

There are, of course, other annual chores necessary to ready your garden tools for spring, but I accomplish many of these in the fall before putting the tools away for a winter's nap.   Lawnmower blades should have been sharpened and motor oils and air filters changed, and other lawnmowerish mechanical parts greased.  The handles of wood tools should have been coated with boiled linseed oil to protect and waterproof them for another season. No, not vegetable oil or regular unboiled linseed oil, you should have used boiled linseed oil because the latter is thicker and dries faster.

Hoes should have been sharpened and the new sharp edges protected from rust by a thick coat of axle grease.  Electric fences should be fortified and raised and perhaps connected to a lethal high-voltage transformer to deter deer and rabbits from stealing the bounty of your future garden. Hoses should be inspected for leaks and washers replaced in the hoses and connectors to prevent leaks.  And the gardener should begin a late-Winter physical conditioning program to prepare for the eventual aches and pains induced by early Spring cleanup.  I've long felt that one of the good aspects of sporadic good weather in the Midwest was the fact that gardeners have a few days of activity, and then a few days off to heal, gradually increasing the activity level and naturally conditioning the gardener.  It must be much harder for gardeners in Alaska where the weather finally gets nice on July 1st and then all your work has to be done before it turns too cold again on August 1st.

I used to watch my maternal grandfather smear grease over the surface of his plows and every other sharp tool he owned every Fall, and now, forty years later, I know why he did it.  In fact, if you do just about anything you ever saw your grandparents do to prepare for Spring, you'll likely be on the right track.  And buy a pair of Felco pruners.  Your rose canes will be grateful.

Tuesday, March 8, 2011

Wheelbarrow Schlemiel-barrow

Listen carefully.  I'm about to divulge my best, most-useful, most-fabulous gardening secret.  Wait for it....wait for it....

Get rid of your wheelbarrow. 

Wheelbarrows are medieval, cumbersome, unwieldy, often heavy, monstrosities that should be banned from gardening circles and left to muscular, sweaty construction crews.  Literally, although there is some evidence that the Greeks and Romans may have used something similar, the best evidence is that the wheelbarrow became popular during the dark Middle Ages of Western culture.  As far as I am concerned  it should have been left there in the Middle Ages. 

I don't own a wheelbarrow anymore.  I've had two in the past twenty years; a typical steel-bodied, one-wheel contraption, and a two-wheeled plastic cart.  Both suffered from the same problems in my eyes; limited payload sizes, a strong tendency to tip over on uneven surfaces and with large loads, tiresome to drag back up the Flint Hills after emptying, and finally, they just took up too much storage space.  I threw the last one out when it fell off its designated wall hanger and banged into my shin.

Instead, for the past five years, I've been happy using a simple flat bedsheet to collect all my spring garden debris.  The particular bedsheet I use, pictured at right, is an old one, in fact it was a wedding gift for us 28 years ago, our first set of married sheets.  Once retired from use for slumber and other indoor activities, it has been variously used over the years as a frost cover for plants, and as a dropcloth for painting walls and staining decks before it was requisitioned as a load-bearing device. In fact, it could still be used for most of  those activities without sacrificing its usefulness as my substitute barrow.  My "sheetbarrow."      

There are a number of advantages to a sheetbarrow, not the least of which is that you don't have to lift the load except to gather the forward three corners and angle them up a bit.  In that regard, it still functions as a somewhat flexible Class II Lever (I'm sorry to introduce Physics 101 into the subject).  The ground supports all the weight of the load and the energy to overcome the friction of a fairly smooth cotton surface against the smooth grass is substituted for the energy of bearing the weight of the load, to the benefit of my lumbar vertebrae.  It stays where you stop, never trying to continue downhill in an accelerating fashion. It won't tip over a heavy load and smash your toes.  It is light to carry back uphill after you dump the load and dumping the load is a simple matter of "flipping" the sheet. And it folds (or crumples) compactly for easy storage.      

Now, it's true, you could purchase a reinforced plastic tarp or an expensive, heavy cansas tarp and accomplish the same task, but an old bedsheet is lighter, and doesn't make the irritating crackly plastic noises of a store-bought tarp.  The stain and paint residue has left my bedsheet stiff in places and may have welded the fibers together to improve the material strength, but I've only got one small hole in it after five years of Spring use for all kinds of materials, including vast loads of thorny rose trimmings.  And perhaps it is true that the sheetbarrow works exceptionally well in my circumstances because I garden on a hill and deposit all the wastes at the bottom of the hill so that I'm always moving the weight downhill over a smooth mown grass surface.  But I can pile a lot of material, including limbs, on a bedsheet that I couldn't fit into a wheelbarrow and I've never had the bedsheet smash one of my toes. 

So rummage through your closet, grab an old bedsheet, and give it a try.  You may not agree that it performs quite as good as I've advertised, but I believe you'll find it an improvement over your typical hardware store wheelbarrow offering.  If nothing else, the memories evoked by the old sheet may keep a smile on your face as you trudge down and back from the debris pile. 

Tuesday, February 22, 2011

Spring Cuttings

Anyone living in or near the MidWest knows that we had a miraculous warm spell last weekend, and I know that some might be asking "What did ProfessorRoush do on his glorious weekend?"   Or, more likely, probably not, since most of you were too excited to be out in your own gardens to think about your blogging companions.

In the last "warm" spell of a couple weeks back, I took advantage of a 55ºF day to finally get the fruit trees trimmed and the dormant spray applied.  So the next thing on my yearly list, other than waiting for whatever little floral creature decides to be the first to bloom and brighten my Spring, was to tackle trimming the grape vines into shape before their sap flow starts.  I had intended to do them along with the fruit tree pruning, but realized on that particular weekend that I would have to stand knee deep in the remnants of a snow drift to prune them, and that action seemed a little too extreme.  But this past weekend, the temperatures hit 68ºF and out came the pruners and "Voila!", the grapes were ready for spring.  From there, I went to trimming back all the ornamental grasses, since I had noticed that the KSU garden had done their grass haircuts already. I went on to start cleaning off the front landscaping beds but finally the brisk Flint Hills winds drove me indoors.  It was either that or have chapped hands and an earache to start out Spring.


I don't know how everyone else cuts back their grasses, but I had the fortune of purchasing, a few years back, a Black & Decker battery-operated set of tools containing a sander, circular saw, reciprocating saw, and drill.  The reciprocating saw, with a 4 inch blade, is what I use for trimming back fruit and landscape trees and it makes quick work of my spring trimming chores. But even better than that, I separately purchased the long-handled hedge trimmer (pictured below) that was compatible with the set and I've found it a snap for some grasses, allowing me to stand upright and shear them off with the greatest of ease. The portable trimmer makes quick work of the small-stemmed Panicum sp, and Calamagrostis sp, and the Pennisetum's, or the Schizachyrium cultivars.  Seeing the grasses cut back and the garden lines so much cleaner is one of  my favorite feelings of springtime, sort of on a par with the satisfaction of washing my Jeep after running it down a muddy country road.  Old men and their power toys are a match made in gardening heaven.


Unfortunately, like everything else, my portable trimmer fails me during assaults against the majority of the Miscanthus cultivars.  Some cultivars, like 'Morning Light' or 'Gracillimus' are moderately susceptible to the wiles of the trimmer.  On many of those monsters, however, like the mighty striped Miscanthus sinensis 'Zebrinus', I grumble and cry and finally get down on my knees at the base of the grass clump to pray to the Prairie Gods that I'm still young and fit enough to chop through a large clump with manual hedge trimmers.  If you haven't grown Miscanthus, you might not know about this, but these beasts of the grass family cannot be hacked with machete nor trimmed with power equipment.  It takes a pair of good strong arms and a stiff set of shears to bring them down each Spring.  Even worse than cutting them back is any attempt to move them, as their root masses form solid clumps of wood deep in the ground that I have found impossible to lift or divide without the aid of a bulldozer.  I'm currently planning the division and move for several of my taller misplaced Miscanthus this Spring, and I'm vacillating between using dynamite or hiring several unsuspecting teenagers for the task.  It's a tough choice, but I'll likely gravitate in the end towards the explosives since they'll be quieter and less destructive to the surrounding plants than the teenagers. 

LinkWithin

Related Posts Plugin for WordPress, Blogger...